Design of ring installation: Difference between revisions
No edit summary |
No edit summary |
||
| Line 22: | Line 22: | ||
==Inital state== | ==Inital state== | ||
The file in an initial state takes into account the graphical presentation of the ground and the floor, shown in two separate sheets.<br/><span style="color: cornflowerblue">More about ''editing the structure'': [[Graphical presentation of the building structure]]<!--Case 98632--></span>.''<br/> | The file in an initial state takes into account the graphical presentation of the ground and the floor, shown in two separate sheets.<br/><span style="color: cornflowerblue">More about ''editing the structure'': [[Graphical presentation of the building structure]]<!--Case 98632--></span>.''<br/> | ||
The file also contains a piece of the water supply including inserted receivers and water supply risers. Tips on how to make such a basic file are contained in the article [[Design of water installation - basics]]. | |||
:*The file in an initial state:[[File:Instal-san-t-example-file-of-ring-installation-initial-state.ISB]]<br/><span style="color: cornflowerblue">More about ''hot to download the file'': [[Downloading and calculating file from HelpSystem]].</span> | :*The file in an initial state:[[File:Instal-san-t-example-file-of-ring-installation-initial-state.ISB]]<br/><span style="color: cornflowerblue">More about ''hot to download the file'': [[Downloading and calculating file from HelpSystem]].</span> | ||
<!--===Projekt=== | <!--===Projekt=== | ||
Revision as of 10:33, 27 August 2014
| Product | InstalSystem 4 |
| Type of article | Software application |
| Content up-to-date for version | IS 4.13 |
Range of lesson
The following lesson demonstrates how make installation of the water supply system in Instal-san T, using the ring system.
The installation is located in a two-storey public utility building with basement.
Modules and program configuration
- Instal-san T allows to make a project of the water supply system.
- catalogs containing the most suitable for the ring installations connections systems:
- U-fittings system with direct plugging of a tap to the U-fitting for looping or
- system with direct plugging of a tap to the U-fitting for looping
Inital state
The file in an initial state takes into account the graphical presentation of the ground and the floor, shown in two separate sheets.
More about editing the structure: Graphical presentation of the building structure.
The file also contains a piece of the water supply including inserted receivers and water supply risers. Tips on how to make such a basic file are contained in the article Design of water installation - basics.
- The file in an initial state:File:Instal-san-t-example-file-of-ring-installation-initial-state.ISB
More about hot to download the file: Downloading and calculating file from HelpSystem.
- The file in an initial state:File:Instal-san-t-example-file-of-ring-installation-initial-state.ISB
Steps to perform
Uruchomienie aplikacji i konfiguracja podstawowych danych projektu
- Uruchomić program Instal-san T.
- Wczytać plik z przygotowaną, przedstawioną na rzutach konstrukcją oraz fragmentem instalacji obejmującym odbiorniki oraz piony wodociągowe.
Wstawienie działek wody użytkowej
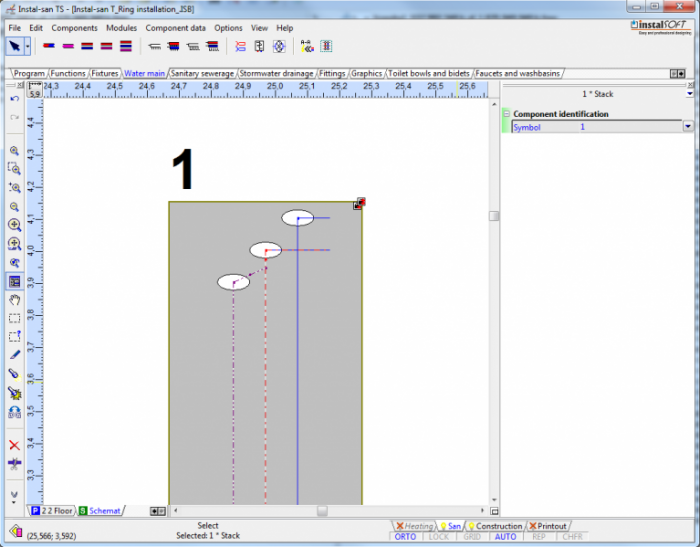
- Wstawić na każdej kondygnacji działki z.w.u. i c.w.u. w formie niedomkniętego pierścienia otaczającego zasilane odbiorniki. Program pozwoli na domknięcie pierścienia po podłączeniu odbiorników.
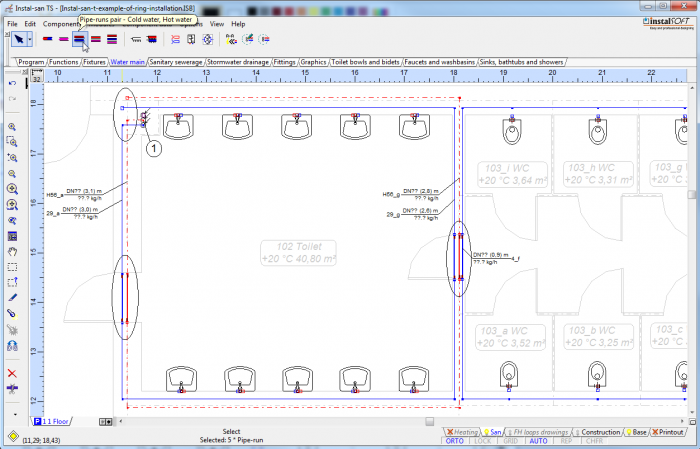
1. Niedomknięty pierścień działek wody użytkowej

Podłączenie odbiorników
- Podłączenie odbiorników sposobem trójnikowym z bezpośrednim włączeniem punktu czerpalnego do trójnika:
- Zaznaczyć fragment instalacji, tak by uwzględnić odbiorniki i działki, które chcemy połączyć, a następnie wybrać kombinację przycisków Shift+Ctrl+A lub opcję "Automatycznie podłącz odbiorniki" udostępnioną w menu Elementy.
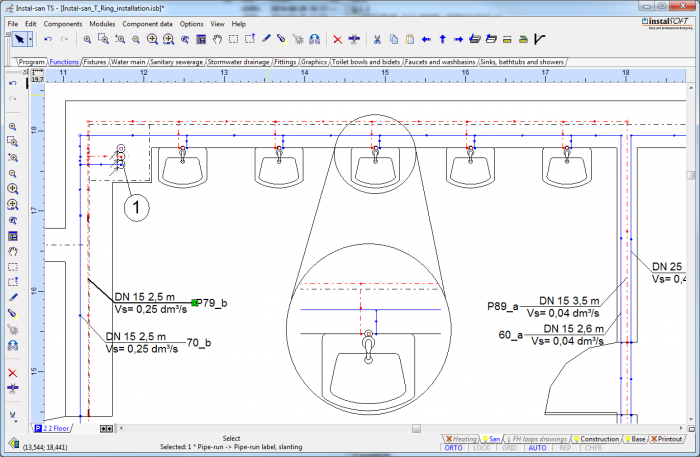
2. Odbiorniki podłączone za pomocą trójników 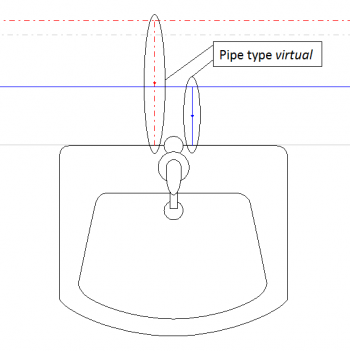
3. Działki wirtualne przy podłączeniach z trójnikami - W systemie trójnikowym, po wybraniu opcji "Automatycznie podłącz odbiorniki", nadać typ rury "wirtualny" dla działek tworzących podejścia do odbiorników.
- Zamyknąć pierścień instalacji.
- Zaznaczyć fragment instalacji, tak by uwzględnić odbiorniki i działki, które chcemy połączyć, a następnie wybrać kombinację przycisków Shift+Ctrl+A lub opcję "Automatycznie podłącz odbiorniki" udostępnioną w menu Elementy.
- Podłączenie odbiorników w systemie z bezpośrednim włączeniem punktu czerpalnego do U-kształtki:
- Zaznaczyć fragment instalacji, tak by uwzględnić odbiorniki i działki, które chcemy połączyć, a następnie wybrać kombinację przycisków Shift+Ctrl+L lub opcję "Automatycznie podłącz odbiorniki w systemie trójnikowym" udostępnioną w menu Elementy.
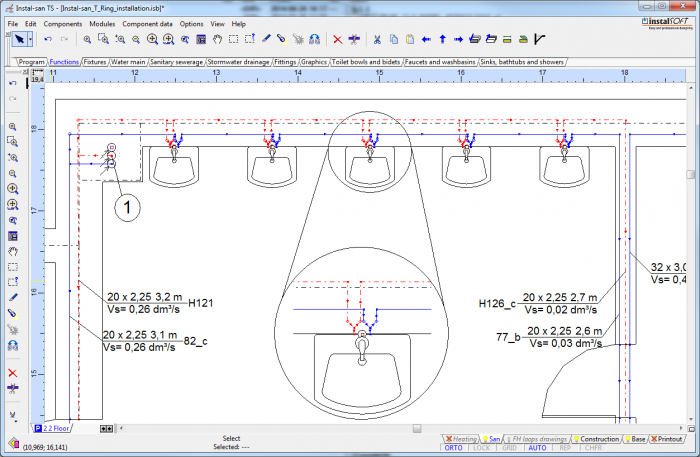
4. Odbiorniki podłączone za pomocą U-kształtek 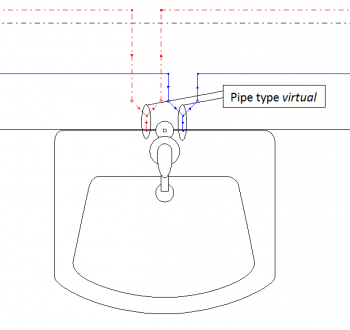
5. Działki wirtualne przy podłączeniach z U-kształtkami - W systemie tworzącym podłączenia za pośrednictwem U-kształtek, program automatycznie nada typ rury "wirtualny" dla działek tworzących podejścia do odbiorników.
- Zamyknąć pierścień instalacji.
Więcej na temat Podłączania odbiorników: Podłączanie odbiorników.
- Zaznaczyć fragment instalacji, tak by uwzględnić odbiorniki i działki, które chcemy połączyć, a następnie wybrać kombinację przycisków Shift+Ctrl+L lub opcję "Automatycznie podłącz odbiorniki w systemie trójnikowym" udostępnioną w menu Elementy.


Utworzenie rozwinięcia instalacji
- Jeżeli w projekcie występuje cyrkulacja, powinna być ona zakończona przed pierścieniem.
6. Armatura - Pozostałe fragmenty rozwinięcia instalacji utworzyć w sposób standardowy.

Final state
Poniżej załączono plik wynikowy:
Plik projektu, Instal-san T: <br\>Plik:Instal-san-t-example-of-ring-installation.ISB
More about hot to download the file: Downloading and calculating file from HelpSystem.