Drawing assistant: Difference between revisions
Jump to navigation
Jump to search
No edit summary |
No edit summary |
||
| Line 12: | Line 12: | ||
==Description== | ==Description== | ||
Drawing assistant is avaiable in the package [[InstalSystem 4]] and [[NetSystem 4]]. <br/> | Drawing assistant is funcionality avaiable in the package [[InstalSystem 4]] and [[NetSystem 4]]. <br/> | ||
It supports system designing, enables drawing or inserting into the project elements at a predetermined distance and at a given angle in addition to an already existing element in the project: imported base, building construction or other. It also allows the imposition of a drawn length of the pipe-run or a section of the network. | It supports system designing, enables drawing or inserting into the project elements at a predetermined distance and at a given angle in addition to an already existing element in the project: imported base, building construction or other. It also allows the imposition of a drawn length of the pipe-run or a section of the network. | ||
==Location in the program== | ==Location in the program== | ||
Drawing assistant can be triggered by: | |||
* F6 key | * F6 key | ||
* toolbar ''View / Show/hide drawing assistant'' [[File:Assistant icon.png]] .<br \> | * toolbar ''View / Show/hide drawing assistant'' [[File:Assistant icon.png]] .<br \> | ||
| Line 22: | Line 22: | ||
Drawing assistant window will appear, which contains the following information: | Drawing assistant window will appear, which contains the following information: | ||
* Δx, Δy - increase from the initial section of the network | * Δx, Δy - increase from the initial section of the network | ||
* L - | * L - length of current section | ||
* Angle - the angle of intersection with the x axis | * Angle - the angle of intersection with the x axis | ||
* Help lines - are visible when "Auto" is selected. | * Help lines - are visible when "Auto" is selected. | ||
| Line 28: | Line 28: | ||
==Example of use== | ==Example of use== | ||
==='''Insert the network section of the specified length at Net-san'''=== | ==='''Insert the network section of the specified length at Net-san'''=== | ||
# Turn off AUTO. | # Turn off AUTO mode. | ||
# Select the right type of network and start drawing section in selected location. | # Select the right type of network and start drawing section in selected location. | ||
# To draw a section of example 5 m enter the desired length in Assistant drawing field "L [m]". | # To draw a section of example 5 m enter the desired length in Assistant drawing field "L [m]". | ||
# Finish drawing the section. | # Finish drawing the section. | ||
:[[File:Narzucona-dlugosc.png|700px|left|thumb|2. Drawing the section of predetermined length]]<br clear="all"/> | :[[File:Narzucona-dlugosc.png|700px|left|thumb|2. Drawing the section of predetermined length]]<br clear="all"/> | ||
:'''''Attention!''''' To kept section length turn off AUTO. | :'''''Attention!''''' To kept section length turn off AUTO mode. | ||
==='''Insert the section at a given angle to the existing network section at Net-san'''=== | ==='''Insert the section at a given angle to the existing network section at Net-san'''=== | ||
# Turn on AUTO. | # Turn on AUTO mode. | ||
# Select the right type of network and start drawing section in the selected location. | # Select the right type of network and start drawing section in the selected location. | ||
# To draw a section for example 90º enter the angle in the drawing assistant in the field "Angle of add. crossing help line [º]". | # To draw a section for example 90º enter the angle in the drawing assistant in the field "Angle of add. crossing help line [º]". | ||
| Line 41: | Line 41: | ||
:[[File:Zadany-kat.png|700px|left|thumb|3. Drawing the section at a given angle]]<br clear="all"/> | :[[File:Zadany-kat.png|700px|left|thumb|3. Drawing the section at a given angle]]<br clear="all"/> | ||
:'''''Attention!''''' To help lines were visible turn on AUTO. | :'''''Attention!''''' To help lines were visible turn on AUTO mode. | ||
==='''Insert the section parallel to the wall of a building in Instal-therm'''=== | ==='''Insert the section parallel to the wall of a building in Instal-therm'''=== | ||
# Turn on AUTO. | # Turn on AUTO mode. | ||
# To draw a parallel section from the existing wall by a distance eg. 0.2 m enter the desired distance in the drawing assistant in the field "Dist. of add. parallel help line [m]". | # To draw a parallel section from the existing wall by a distance eg. 0.2 m enter the desired distance in the drawing assistant in the field "Dist. of add. parallel help line [m]". | ||
# Select the right type of the section before the beginning of drawing invade the cursor over the wall to which the sectiont is to be drawn parallel (without selecting). | # Select the right type of the section before the beginning of drawing invade the cursor over the wall to which the sectiont is to be drawn parallel (without selecting). | ||
| Line 49: | Line 49: | ||
# Finish drawing the section. | # Finish drawing the section. | ||
:[[File:Rownolegly.png|700px|left|thumb|4. Drawing the section parallel to the wall with appropriate distance]]<br clear="all"/> | :[[File:Rownolegly.png|700px|left|thumb|4. Drawing the section parallel to the wall with appropriate distance]]<br clear="all"/> | ||
:'''''Attention!''''' To help lines were visible turn on AUTO. | :'''''Attention!''''' To help lines were visible turn on AUTO mode. | ||
==='''Video - Drawing the section at a given angle and parallel'''=== | ==='''Video - Drawing the section at a given angle and parallel'''=== | ||
Revision as of 11:59, 26 August 2014
| Product | InstalSystem 4 NetSystem 4 |
| Type of article | Functionalities |
| Content up-to-date for version | IS 4.13 NS 4.7 |
Description
Drawing assistant is funcionality avaiable in the package InstalSystem 4 and NetSystem 4.
It supports system designing, enables drawing or inserting into the project elements at a predetermined distance and at a given angle in addition to an already existing element in the project: imported base, building construction or other. It also allows the imposition of a drawn length of the pipe-run or a section of the network.
Location in the program
Drawing assistant can be triggered by:
- F6 key
- toolbar View / Show/hide drawing assistant
 .
.
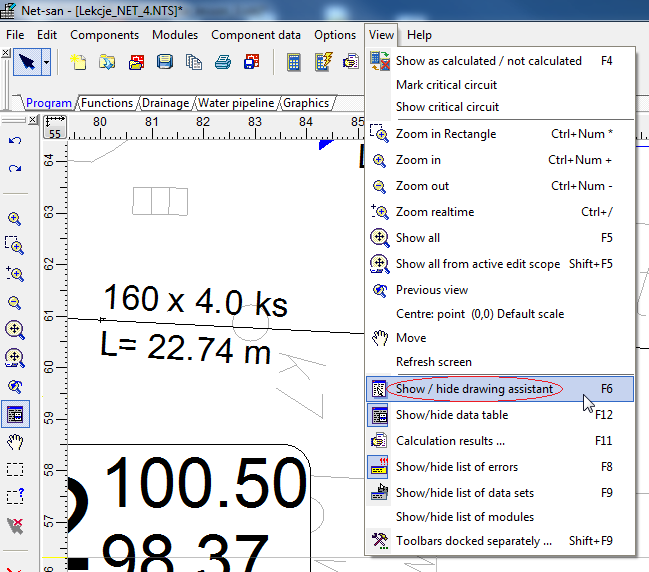
1. Selection drawing assistant from menu

Drawing assistant window will appear, which contains the following information:
- Δx, Δy - increase from the initial section of the network
- L - length of current section
- Angle - the angle of intersection with the x axis
- Help lines - are visible when "Auto" is selected.
Example of use
Insert the network section of the specified length at Net-san
- Turn off AUTO mode.
- Select the right type of network and start drawing section in selected location.
- To draw a section of example 5 m enter the desired length in Assistant drawing field "L [m]".
- Finish drawing the section.
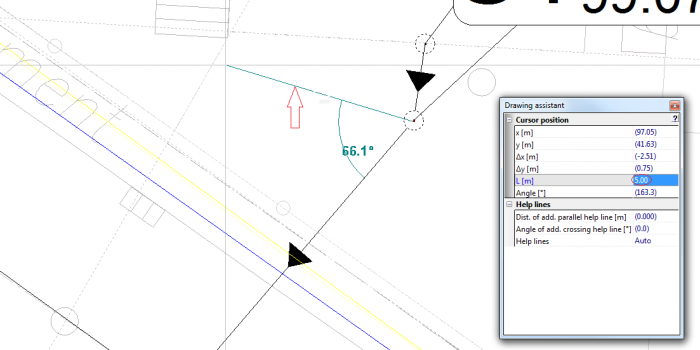
2. Drawing the section of predetermined length - Attention! To kept section length turn off AUTO mode.

Insert the section at a given angle to the existing network section at Net-san
- Turn on AUTO mode.
- Select the right type of network and start drawing section in the selected location.
- To draw a section for example 90º enter the angle in the drawing assistant in the field "Angle of add. crossing help line [º]".
- Using the appearing help lines deflected at a given angle, finish drawing the section.
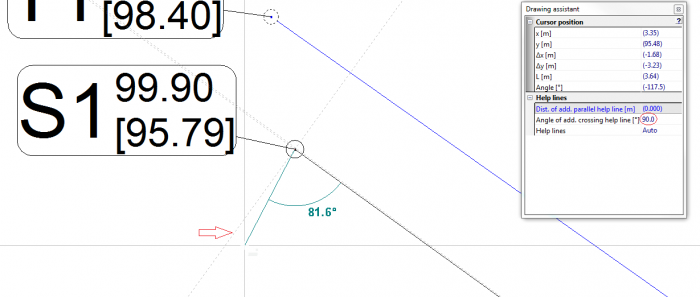
3. Drawing the section at a given angle - Attention! To help lines were visible turn on AUTO mode.

Insert the section parallel to the wall of a building in Instal-therm
- Turn on AUTO mode.
- To draw a parallel section from the existing wall by a distance eg. 0.2 m enter the desired distance in the drawing assistant in the field "Dist. of add. parallel help line [m]".
- Select the right type of the section before the beginning of drawing invade the cursor over the wall to which the sectiont is to be drawn parallel (without selecting).
- Start drawing section in the desired location using the displayed help lines.
- Finish drawing the section.
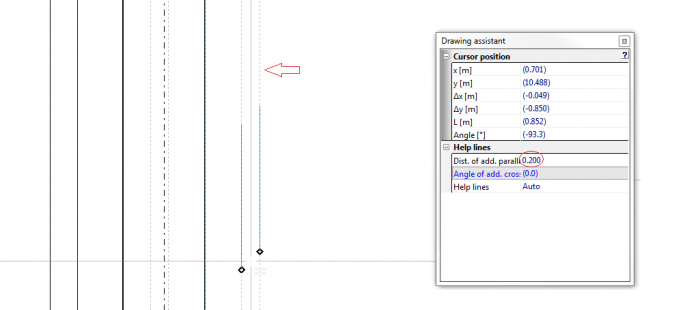
4. Drawing the section parallel to the wall with appropriate distance - Attention! To help lines were visible turn on AUTO mode.
