Design of ring installation: Difference between revisions
No edit summary |
No edit summary |
||
| (3 intermediate revisions by one other user not shown) | |||
| Line 1: | Line 1: | ||
<!--Case 95875--> | |||
{| | {{Article table | ||
|commercial_product1=InstalSystem 4 | |||
|p2 =<!--gdy jest kolejny produkt handlowy, zamienić na->"produkt_handlowy2="--> | |||
|p3 =<!--gdy jest kolejny produkt handlowy, zamienić na->"produkt_handlowy3="--> | |||
|- | |p4 =<!--gdy jest kolejny produkt handlowy, zamienić na->"produkt_handlowy3="--> | ||
| | |category1 =InstalSystem 4#SOFTWARE APPLICATIONS | ||
| [ | |category_name1 =DESIGN APPLICATION | ||
|c2 =<!--Jest kategoria -> zamienić na: "category2=" i uzupełnić link do sekcji kategorii na stronie głównej produktu--> | |||
|category_name2 =<!--podać nazwę kategorii "ZASTOSOWANIE"/"FUNKCJONALNOŚĆ"/...--> | |||
|c3 =<!--Jest kategoria -> zamienić na: "category3=" i uzupełnić link do sekcji kategorii na stronie głównej produktu--> | |||
|category_name3 =<!--podać nazwę kategorii "ZASTOSOWANIE"/"FUNKCJONALNOŚĆ"/...--> | |||
|version1 =[http://instalsoft.com/en/products/information-about-changes-in-instalsystem-package.html IS4.13]<!--uzupełnić link do sekcji RN danego produktu--> | |||
|v2 =<!--Jest wersja -> zamienić na: "version2=" i uzupełnić link do sekcji RN danego produktu--> | |||
|v3 =<!--Jest wersja -> zamienić na: "version2=" i uzupełnić link do sekcji RN danego produktu--> | |||
|v4 =<!--Jest wersja -> zamienić na: "version2=" i uzupełnić link do sekcji RN danego produktu--> | |||
}} | |||
==Range of lesson== | ==Range of lesson== | ||
The following lesson demonstrates how make installation of the water supply system in '''Instal-san T''', using the ring system.<br/>The installation is located in a two-storey public utility building with basement. | The following lesson demonstrates how make installation of the water supply system in '''Instal-san T''', using the ring system.<br/>The installation is located in a two-storey public utility building with basement. | ||
| Line 65: | Line 70: | ||
<span style="color: cornflowerblue">More about ''hot to download the file'': [[Downloading and calculating file from HelpSystem]].</span> | <span style="color: cornflowerblue">More about ''hot to download the file'': [[Downloading and calculating file from HelpSystem]].</span> | ||
[[Category: | [[Category:DESIGN APPLICATION]] | ||
[[Category:InstalSystem 4]] | [[Category:InstalSystem 4]] | ||
[[Category:Instal-san T]] | [[Category:Instal-san T]] | ||
Latest revision as of 16:31, 31 October 2017
| Product | InstalSystem 4 |
| Type of article | DESIGN APPLICATION |
| Source for translation | IS4.13 |
Range of lesson
The following lesson demonstrates how make installation of the water supply system in Instal-san T, using the ring system.
The installation is located in a two-storey public utility building with basement.
Modules and program configuration
- Instal-san T allows to make a project of the water supply system.
- catalogs containing the most suitable for the ring installations connections systems:
- U-fittings system with direct plugging of a tap to the U-fitting for looping or
- system with direct plugging of a tap to the U-fitting for looping
Inital state
The file in an initial state takes into account the graphical presentation of the ground and the floor, shown in two separate sheets.
More about editing the structure: Graphical presentation of the building structure.
The file also contains a piece of the water supply including inserted receivers and water supply stacks. Tips on how to make such a basic file are contained in the article Design of water installation - basics.
- The file in an initial state:File:Instal-san-t-example-file-of-ring-installation-initial-state.ISB
More about hot to download the file: Downloading and calculating file from HelpSystem.
- The file in an initial state:File:Instal-san-t-example-file-of-ring-installation-initial-state.ISB
Steps to perform
Running application and configuration of basic project data
- Run the program Instal-san T.
- Load the file with the prepared structure of the building and fragment of installation including receivers and water supply stacks.
Inserting the pipe-runs of utility water
- Put on every storey the pipe-runs of cold tap water and hot tap water in the form of a open ring surrounding powered receivers. The program will allow for the closure of the ring after connecting the receivers.
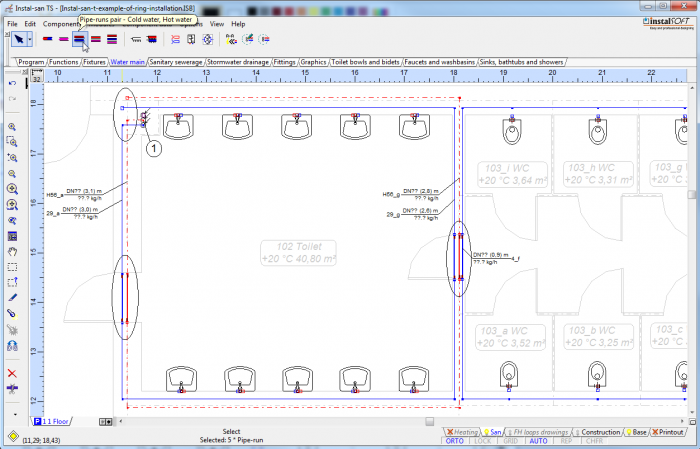
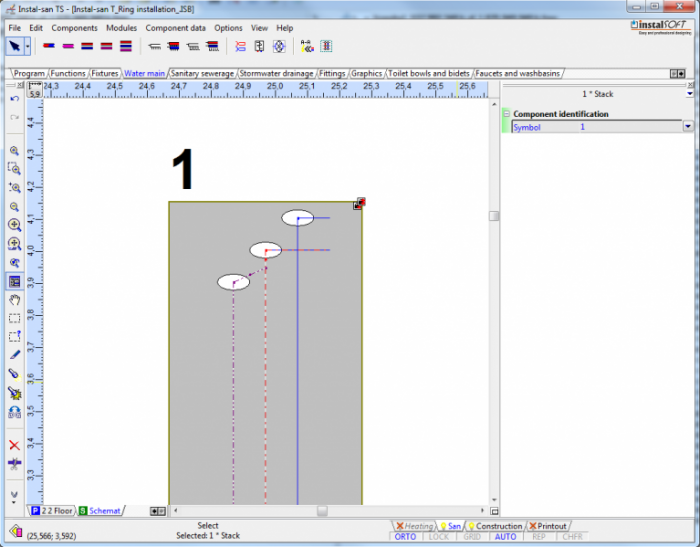
1. Not fully closed ring of utility water pipe-runs

Connecting the receivers
- Connections to the receivers by U-fittings system with direct inclusion tap to the T-fitting:
- Highlight a piece of installation, to take into account the receivers and the pipe-runs want to connect to, and then select the key combination Shift + Ctrl + A or an option "Automatically connect terminal units" available in menu for Components.
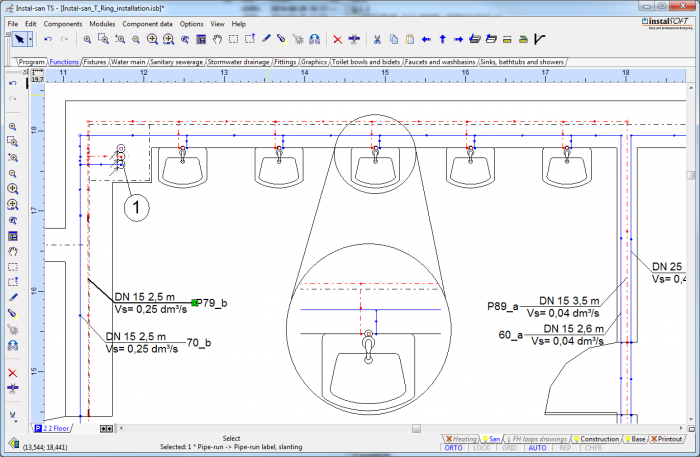
2. Receivers connect by T-fittings 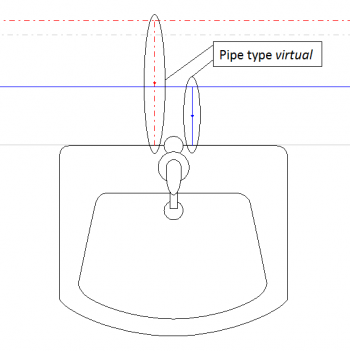
3. Virtual pipe-runs in connections with T-fittings - In U-fittings system, after selecting "Automatically connect terminal units", give the type of pipe-run "virtual" for the pipe-runs comprising approaches to the receivers.
- Close the ring.
- Highlight a piece of installation, to take into account the receivers and the pipe-runs want to connect to, and then select the key combination Shift + Ctrl + A or an option "Automatically connect terminal units" available in menu for Components.
- Connecting the receivers in the system of direct inclusion of tap for the U-fitting:
- Select the part of the installation, to take into account the receivers and the pipe-runs want to connect to, and then select the key combination Shift + Ctrl + L or an option "Receptor connect automatically with U-Fitting for looping" available in menu for Components.
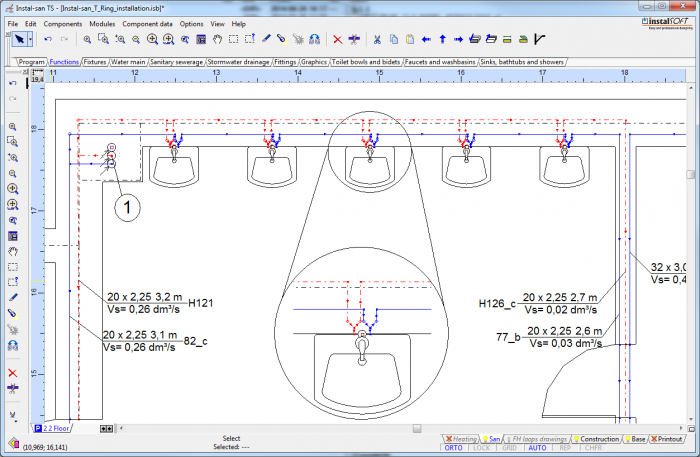
4. Receivers connected using U-fittings 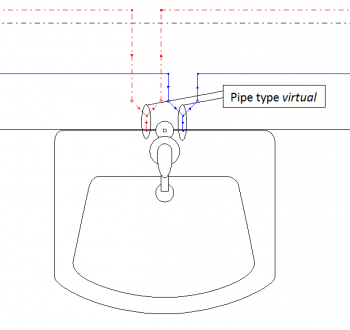
5. Virtual pipe-runs at connections with U-fittings - In the system of forming connections via the U-fittings, the program will automatically set the type of pipe-run "virtual" for the pipe-runs comprising approaches to the receivers.
- Close the ring.
More about connecting the receivers: Connecting the receivers.
- Select the part of the installation, to take into account the receivers and the pipe-runs want to connect to, and then select the key combination Shift + Ctrl + L or an option "Receptor connect automatically with U-Fitting for looping" available in menu for Components.


Creation of schematic view of installation
- If in the project is circulation, it should be completed before the ring.
6. Fittings - Other fragments in the schematic view of installation create in a standard way.

Final state
Below attached the results file:
The project file, Instal-san T: <br\>File:Instal-san-t-example-of-ring-installation.ISB
More about hot to download the file: Downloading and calculating file from HelpSystem.