InstalSmart Desktop: Difference between revisions
Klintsevicho (talk | contribs) No edit summary |
Kowalczykr (talk | contribs) |
||
| (14 intermediate revisions by 2 users not shown) | |||
| Line 18: | Line 18: | ||
==Scope of lesson== | ==Scope of lesson== | ||
This article presents the basic path for quick and easy design of underfloor heating installations. | This article presents the basic path for quick and easy design of underfloor heating installations. | ||
Projects | Projects created in '''InstalSmart''' can be further continued in the '''InstalSystem''' application. However, projects created in InstalSystem cannot be opened in InstalSmart.<br/> | ||
The '''InstalSmart''' application is limited to only five windows: ''<IS_TS id=rsDanogi/>'', ''<IS_TS id=GraphicalEdit/>'', ''<IS_TS id=ResultModuleTitle/>'', ''<IS_TS id=ErrorModuleTitle/>'' and ''<IS_TS id=DataEditorTable/>'' and has a fixed window layout. The application has one common ribbon with all icons/functions for all editing scopes. '''InstalSmart''' is based on the full '''InstalSystem''' application and allows to prepare simplified projects that can form the basis for initial evaluation of underfloor heating installations. | |||
==Modules and program configuration== | ==Modules and program configuration== | ||
* '''InstalSmart''' with | * '''InstalSmart''' is equipped with two primary modules:: | ||
**'''Base module''' | **'''Base module''' | ||
**'''<IS_TS id=SystemyPlaszczyznowe/>''' | **'''<IS_TS id=SystemyPlaszczyznowe/>''' | ||
| Line 27: | Line 29: | ||
==Videos related to the article== | ==Videos related to the article== | ||
<br/>{{#ev:youtube|dOfJG2fXKwE|450||||rel=0}} <br clear="all"/> | <br/>{{#ev:youtube|dOfJG2fXKwE|450||||rel=0}} <br clear="all"/> | ||
The | The video presents the topics described in this article, but they aren’t a recording of this lesson. | ||
==Steps to perform== | ==Steps to perform== | ||
| Line 35: | Line 37: | ||
====Installation, activation, updating==== | ====Installation, activation, updating==== | ||
Install the program via "Install" button.<br/> | Install the program via "Install" button.<br/> | ||
[[File:ISmart | [[File:ISmart Install.png|900 px|left|thumb|1. InstalSmart5 Manager EN.]]<br clear="all"/> | ||
To activate the free neutral version of the program use the multi-activation license number '''SM-ISFEN-2432-001-YA'''.<br/>[[File:ISmart Activation.png|900 px|left|thumb|2. Program activation.]]<br clear="all"/> | To activate the free neutral version of the program use the multi-activation license number '''SM-ISFEN-2432-001-YA'''.<br/>[[File:ISmart Activation.png|900 px|left|thumb|2. Program activation.]]<br clear="all"/> | ||
| Line 44: | Line 46: | ||
====Editing the general project data==== | ====Editing the general project data==== | ||
=====<IS_TS id=KTENazwaRodzaju/>===== | =====<IS_TS id=KTENazwaRodzaju/>===== | ||
* | * Specify the object's location to automatically retrieve ''<IS_TS id=sENDaneBudynkuTempZewnetrzna/>'' based on climatic data.<br/>[[File:ISmart Climatic data.png |900 px|left|thumb|4.<IS_TS id=KTENazwaRodzaju/>.]]<br clear="all"/> | ||
=====<IS_TS id=StoreyManagement/>===== | =====<IS_TS id=StoreyManagement/>===== | ||
| Line 81: | Line 83: | ||
*# ''<IS_TS id=rpPomieszczeniePunktowe/>'' - the label of the ''<IS_TS id=rsPomieszczenie/>'' that is placed together with the label of the ''<IS_TS id=iNameOPStrefaPodlogGrzejnych/>''. In this case the area of the room needs to be specified manually. The area of the ''<IS_TS id=iNameOPStrefaPodlogGrzejnych/>'' will be automatically determined accordingly.{{#ev:youtube|Lc795UlWVEU|900||||rel=0}}<br/> | *# ''<IS_TS id=rpPomieszczeniePunktowe/>'' - the label of the ''<IS_TS id=rsPomieszczenie/>'' that is placed together with the label of the ''<IS_TS id=iNameOPStrefaPodlogGrzejnych/>''. In this case the area of the room needs to be specified manually. The area of the ''<IS_TS id=iNameOPStrefaPodlogGrzejnych/>'' will be automatically determined accordingly.{{#ev:youtube|Lc795UlWVEU|900||||rel=0}}<br/> | ||
*# ''<IS_TS id=rsPomieszczenie/>'' - <IS_TS id=rprsPomieszczenieDesc/>. In this case the area of the room is indicated automatically.<br/>[[File:ISmart Room.png|900 px|left|thumb|11. Inserting <IS_TS id=rsPomieszczenie/>.]]<br clear="all"/> {{Info}} [[Preparation of building structure - Rooms layout#Inserting a room | Inserting a room]].<br/><br/> | *# ''<IS_TS id=rsPomieszczenie/>'' - <IS_TS id=rprsPomieszczenieDesc/>. In this case the area of the room is indicated automatically.<br/>[[File:ISmart Room.png|900 px|left|thumb|11. Inserting <IS_TS id=rsPomieszczenie/>.]]<br clear="all"/> {{Info}} [[Preparation of building structure - Rooms layout#Inserting a room | Inserting a room]].<br/><br/> | ||
* In the ''<IS_TS id=DataEditorTable/>'' specify the ''<IS_TS id=stringSymbol/>'' of the ''<IS_TS id=rsPomieszczenie/>'', ''<IS_TS id=strs_enumidISFPomieszczenieEN12831_TypUzytkowyPomieszczenia/>'' and, | * In the ''<IS_TS id=DataEditorTable/>'' specify the ''<IS_TS id=stringSymbol/>'' of the ''<IS_TS id=rsPomieszczenie/>'', ''<IS_TS id=strs_enumidISFPomieszczenieEN12831_TypUzytkowyPomieszczenia/>'' and, where needed, correct the value of ''<IS_TS id=strTempPomOgrzewanieSymbol/>'' - ''<IS_TS id=TemperaturaPomieszczeniaDlaOkresuGrzania/>''. | ||
=====Radiant - floors and walls scope===== | =====Radiant - floors and walls scope===== | ||
| Line 102: | Line 104: | ||
#* ''<IS_TS id=ListaPomieszczenHeatingTitle/>''; | #* ''<IS_TS id=ListaPomieszczenHeatingTitle/>''; | ||
#* ''<IS_TS id=ZestawienieMaterialowTherm/>''.<br/>Every item of the installation presented in the result table can be found in active windows by using [[File:Loupe icon.png|30 px|]] icon.<br/>[[File:ISmart Results tables.png |900 px|left|thumb|14. <IS_TS id=ResultModuleTitle/> window.]]<br clear="all"/> | #* ''<IS_TS id=ZestawienieMaterialowTherm/>''.<br/>Every item of the installation presented in the result table can be found in active windows by using [[File:Loupe icon.png|30 px|]] icon.<br/>[[File:ISmart Results tables.png |900 px|left|thumb|14. <IS_TS id=ResultModuleTitle/> window.]]<br clear="all"/> | ||
# | # If required, adjust the input parameters (e.g. ''<IS_TS id=sTemperaturaZasilania/>'') and recalculate the project to obtain a satisfactory result.<br/><br/> | ||
====<IS_TS id=GraphicalEdit/> - additional advanced options==== | ====<IS_TS id=GraphicalEdit/> - additional advanced options==== | ||
=====<IS_TS id=lystrFloors/> scope===== | =====<IS_TS id=lystrFloors/> scope===== | ||
* '''InstalSmart''' allows to convert ''<IS_TS id=rpPomieszczeniePunktowe/>'' into ''<IS_TS id=rsPomieszczenie/>'' by simple imposition. In this case the program will automatically determine the area of the ''<IS_TS id=rsPomieszczenie/>'' and insert the ''<IS_TS id=iNameOPStrefaPodlogGrzejnych/>'' in accordance with the data of the ''<IS_TS id=rpPomieszczeniePunktowe/>''. The same operation can be done in ''' | * '''InstalSmart''' allows to convert ''<IS_TS id=rpPomieszczeniePunktowe/>'' into ''<IS_TS id=rsPomieszczenie/>'' by simple imposition. In this case the program will automatically determine the area of the ''<IS_TS id=rsPomieszczenie/>'' and insert the ''<IS_TS id=iNameOPStrefaPodlogGrzejnych/>'' in accordance with the data of the ''<IS_TS id=rpPomieszczeniePunktowe/>''. The same operation can be done in '''InstalSystem''' application.<br/>'''Attention:''' If the area of the ''<IS_TS id=rsPomieszczenie/>'' is to be set according to the drawing, switch the ''<IS_TS id=strs_expidISFPomieszczeniePowierzchniaWSwietle/>'' (''<IS_TS id=strl_expidISFPomieszczeniePowierzchniaWSwietle/>'') field to the automatic mode.{{#ev:youtube|mPMlnjV9krs|900||||rel=0}}<br/> | ||
* In the case of necessity to improve the shape of the ''<IS_TS id=rsPomieszczenie/>'', use ''<IS_TS id=InsertEndPoint/>'' function from the right mouse button context menu.<br/>[[File:ISmart Insert dividing point.png|900 px|left|thumb|15. <IS_TS id=InsertEndPoint/>.]]<br clear="all"/> | * In the case of necessity to improve the shape of the ''<IS_TS id=rsPomieszczenie/>'', use ''<IS_TS id=InsertEndPoint/>'' function from the right mouse button context menu.<br/>[[File:ISmart Insert dividing point.png|900 px|left|thumb|15. <IS_TS id=InsertEndPoint/>.]]<br clear="all"/> | ||
=====Radiant - floors and walls scope===== | =====Radiant - floors and walls scope===== | ||
'''InstalSmart''' provides the opportunity to divide ''<IS_TS id=iNameOPStrefaPodlogGrzejnych/>'' into a defined number of parts or along a drawn line without or with ''<IS_TS id=DylatacjaCaption/>'' using the functions from the the right mouse button context menu.<br/>[[File:ISmart Divide zone.png |900 px|left|thumb|16. <IS_TS id=PodzielStrefe/>.]]<br clear="all"/> | '''InstalSmart''' provides the opportunity to divide ''<IS_TS id=iNameOPStrefaPodlogGrzejnych/>'' into a defined number of parts or along a drawn line without or with ''<IS_TS id=DylatacjaCaption/>'' using the functions from the the right mouse button context menu.<br/>[[File:ISmart Divide zone.png |900 px|left|thumb|16. <IS_TS id=PodzielStrefe/>.]]<br clear="all"/> | ||
| Line 115: | Line 118: | ||
====Saving the project and continuing it in the InstalSystem application==== | ====Saving the project and continuing it in the InstalSystem application==== | ||
Proceed to save the project and, if necessary, continue working on it in '''InstalSystem''' application in accordance with [[Designing of radiant heating installation on the basis of data from the Smart application]]. | |||
[[Category:InstalSmart]] | [[Category:InstalSmart]] | ||
[[Category:DESIGNING LESSON]] | [[Category:DESIGNING LESSON]] | ||
Latest revision as of 14:45, 3 October 2024
| Product | InstalSmart |
| Type of article | DESIGNING LESSON |
| Source for translation | 2024-09-09 |
Scope of lesson
This article presents the basic path for quick and easy design of underfloor heating installations.
Projects created in InstalSmart can be further continued in the InstalSystem application. However, projects created in InstalSystem cannot be opened in InstalSmart.
The InstalSmart application is limited to only five windows: General data, 2D editor, Results, Diagnostics and Data table and has a fixed window layout. The application has one common ribbon with all icons/functions for all editing scopes. InstalSmart is based on the full InstalSystem application and allows to prepare simplified projects that can form the basis for initial evaluation of underfloor heating installations.
Modules and program configuration
- InstalSmart is equipped with two primary modules::
- Base module
- Radiant systems
The video presents the topics described in this article, but they aren’t a recording of this lesson.
Steps to perform
Preparing the working environment
Gaining access to the application
Download the program installation file from our website: Installation files.
Installation, activation, updating
Install the program via "Install" button.

To activate the free neutral version of the program use the multi-activation license number SM-ISFEN-2432-001-YA.

Creating the project file
Create the project using the New project function.

Working with the project
Editing the general project data
Climatic data
- Specify the object's location to automatically retrieve External temperature, design based on climatic data.
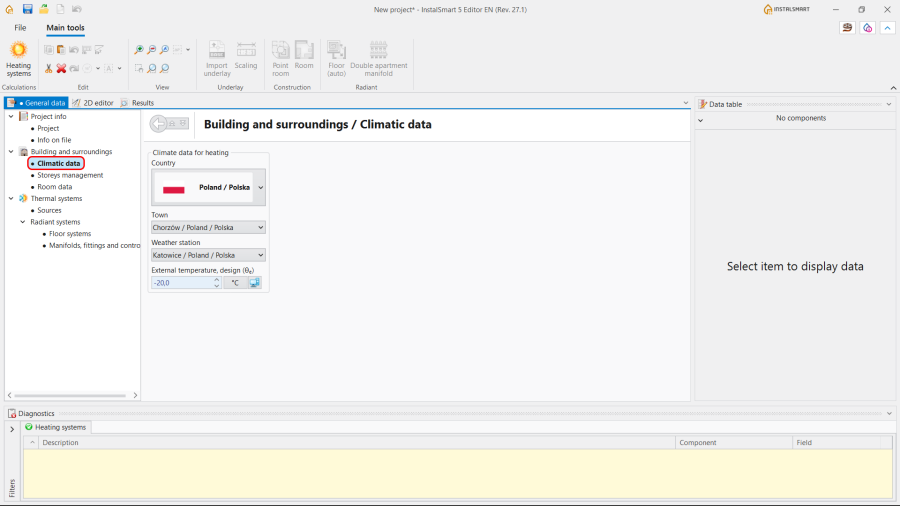
4.Climatic data.

Storeys management
- Create the required number of storeys;
- Specify Symbol and Description for each Storey;
- Fill in the sections Position and Sizes.
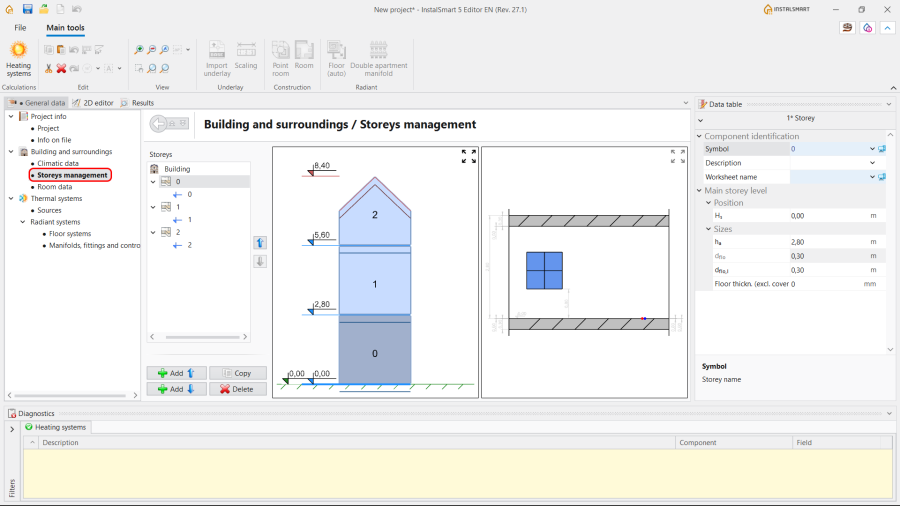
5.Storeys management.

Room data
- Choose the Method of calculating Φ - Calculated acc. to coefficient or User specified;
- (Optionally) Adjust the Heat loss index Φsurf,H.
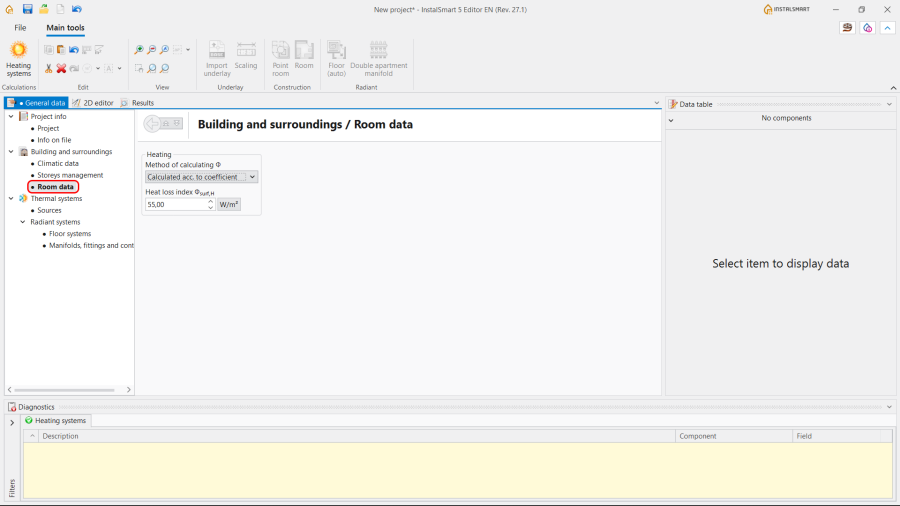
6.Room data.

Thermal systems / Sources
Select the method of determining the supply temperature:
- Optimized by the program in accordance with min. investment costs or heat output and press. drop;
- Impose supply temperature manually.
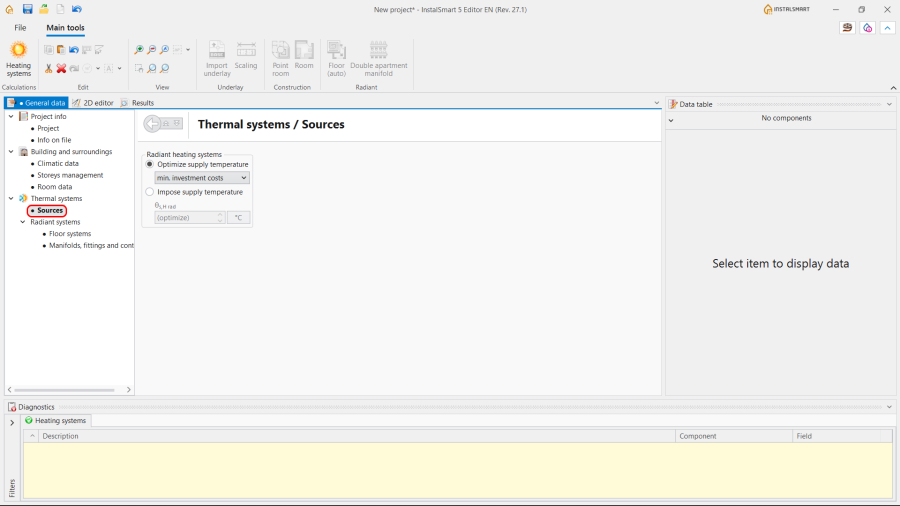
7.Thermal systems / Sources.

Thermal systems / Radiant systems
- Floor systems:
- Specify Structural parameters;
- Specify Operating parameters.
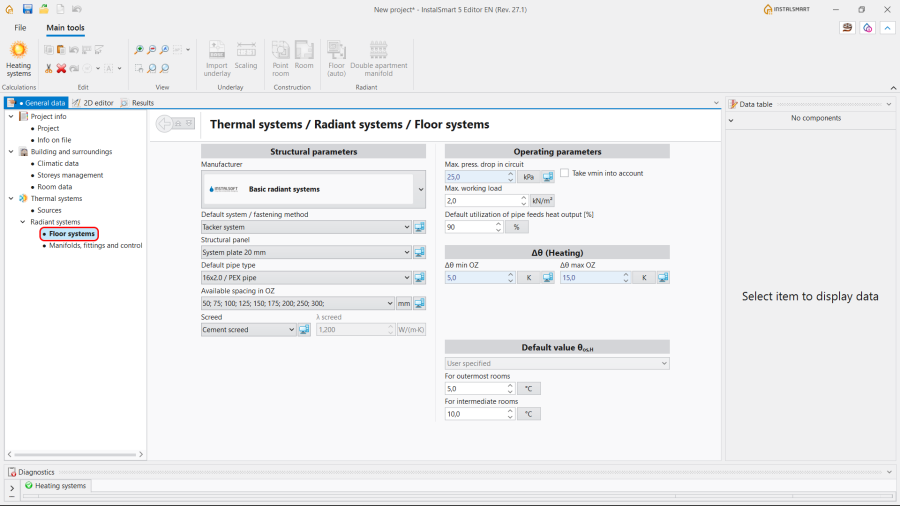
8.Thermal systems / Radiant systems / Floor systems.
Note: InstalSmart application does not offer the following options: - generating loops, so there is no ability to set the Pipe laying pattern and to Generate loops drawings;
- inserting the Peripheral zone (PZ), so the adjustment of Available spacing in PZ is impossible;
- setting the H/C Area spacing from wall;
- pipe-feeds routing, so there is no possibility to specify the settings for the Pipe feeds arrangement;
- automatically indicating of the Default value θos,H (Temperature on the opposite side during heating period), so this value can be only User specified.
- Manifolds, fittings and control:
- Specify parameters for the Manifold;
- Specify parameters for the Circuit control system.
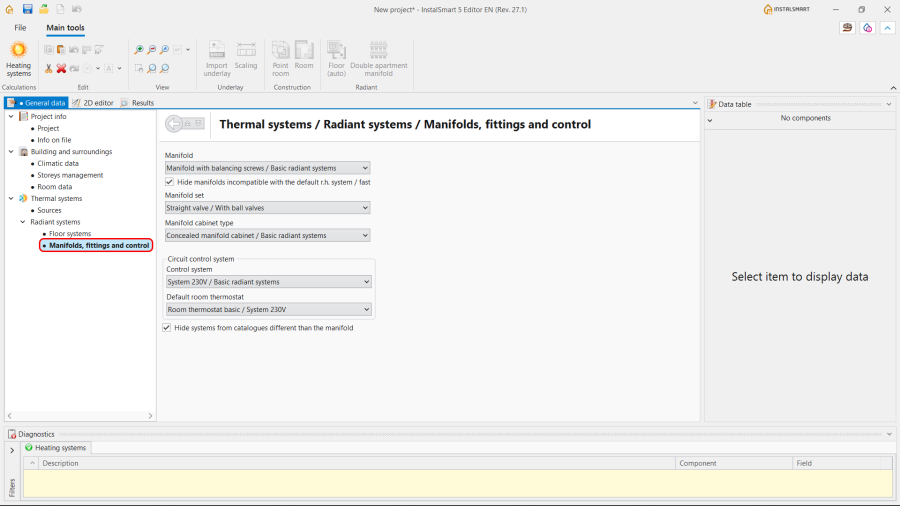
9.Thermal systems / Radiant systems / Manifolds, fittings and control.


Editing the installation and its data
Underlay scope
- Import underlay;
- Make Scaling of the Underlay.
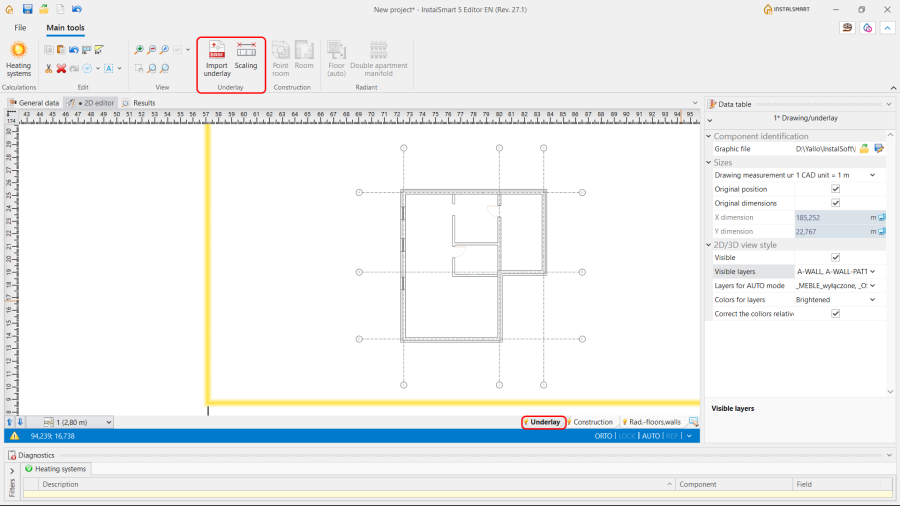
10. Import underlay.
For more information, see: Import underlay files.
Note: The usage of IFC format files is not possible in the InstalSmart application.

Construction scope
- Insert the Room. InstalSmart provides the possibility to insert 2 types of this element:
- Point room - the label of the Room that is placed together with the label of the Heating/Cooling Floor Zone. In this case the area of the room needs to be specified manually. The area of the Heating/Cooling Floor Zone will be automatically determined accordingly.
- Room - Allows to create contours of rooms. In this case the area of the room is indicated automatically.

11. Inserting Room.
For more information, see: Inserting a room.
- Point room - the label of the Room that is placed together with the label of the Heating/Cooling Floor Zone. In this case the area of the room needs to be specified manually. The area of the Heating/Cooling Floor Zone will be automatically determined accordingly.
- In the Data table specify the Symbol of the Room, Room type and, where needed, correct the value of θi,H - Design room temperature.

Radiant - floors and walls scope
- Insert Heating/Cooling Floor Zone for the Room using the Floor (auto) function;
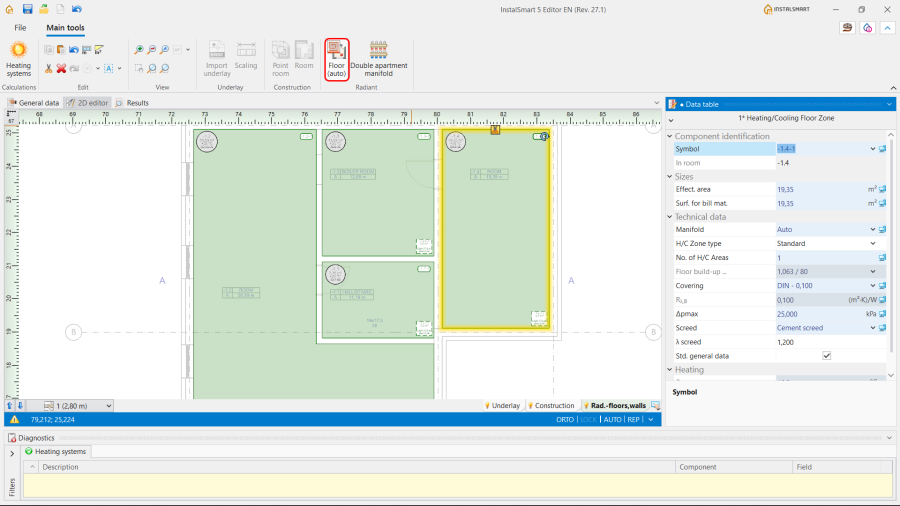
12. Inserting Floor (auto). - If necessary, correct the parameters of the Heating/Cooling Floor Zone in the Data table:
- H/C Zone type: Standard or Heated/cooled by pipe feeds;
- Covering.
- (Optionally) The checkbox Std. general data is turned ON by default. Checkbox ON - program will apply default settings from "General data" window.
Checkbox OFF - program will allow to set parameters individually.
- (Optionally) Insert Double apartment manifold and if necessary to account for correct the data in the Data table:
- design length of pipe feeds in the Bill of materials - heating / cooling;
- pressure losses in pipe feeds in hydraulic calculations;
- Manifolds, Manifold cabinets, Pipe fittings and Manifold valves set in the Bill of materials - heating / cooling and hydraulic calculations.
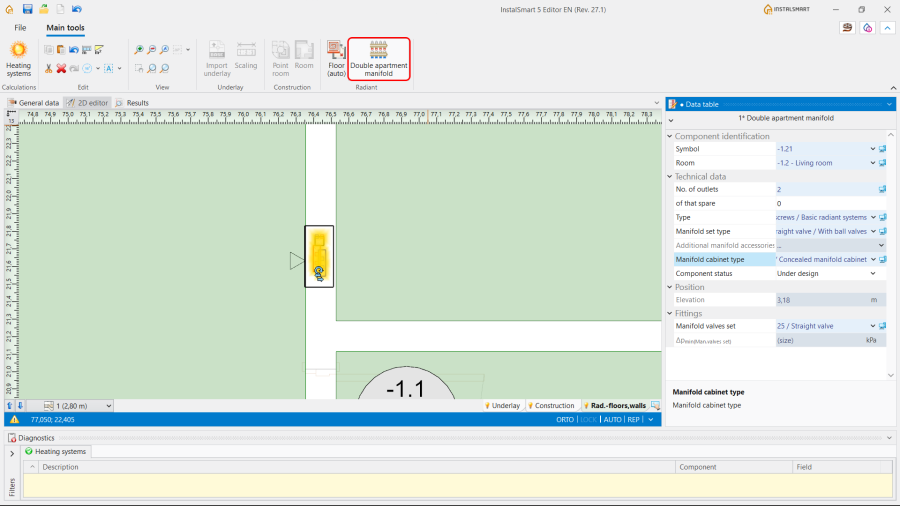
13. Inserting Double apartment manifold.
.png)

Calculations and diagnostics
- Launch calculations by clicking the
 icon in the Calculations section of the toolbar;
 - Сheck messages the Diagnostics window. First of all, eliminate Errors;
- Verify calculation results in the Results window:
- Radiant heating general results;
- Detailed radiant heating results;
- List of rooms - heating;
- Bill of materials - heating / cooling.
Every item of the installation presented in the result table can be found in active windows by using icon.
icon.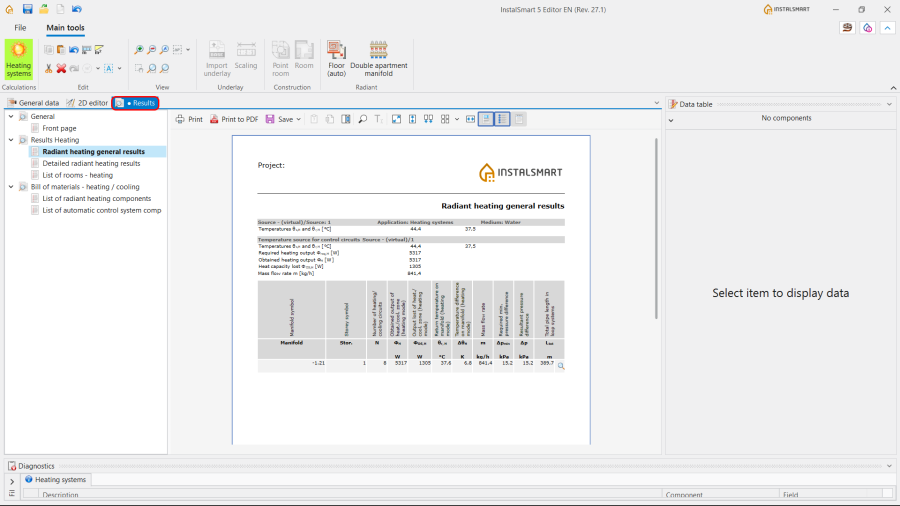
14. Results window.
- If required, adjust the input parameters (e.g. Supply temperature) and recalculate the project to obtain a satisfactory result.

2D editor - additional advanced options
Construction scope
- InstalSmart allows to convert Point room into Room by simple imposition. In this case the program will automatically determine the area of the Room and insert the Heating/Cooling Floor Zone in accordance with the data of the Point room. The same operation can be done in InstalSystem application.
Attention: If the area of the Room is to be set according to the drawing, switch the Af (Room area within partition faces|Room area faces) field to the automatic mode. - In the case of necessity to improve the shape of the Room, use Insert dividing point function from the right mouse button context menu.
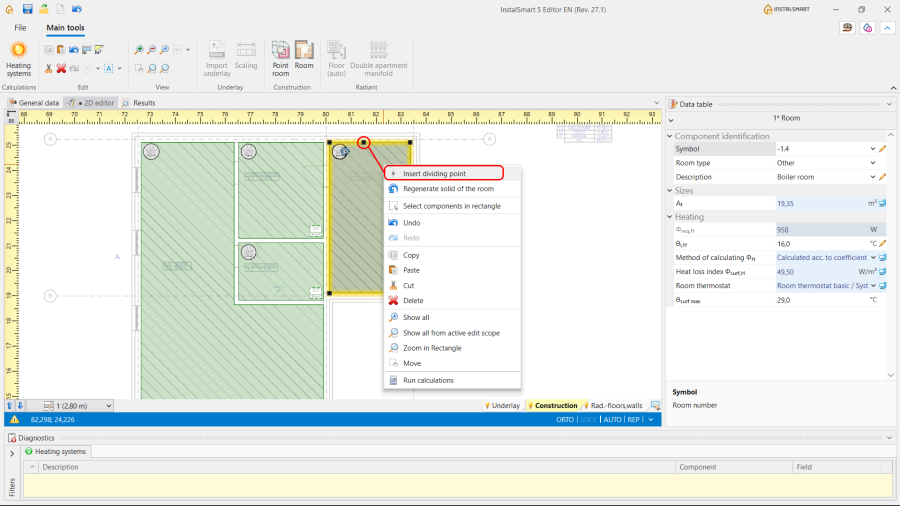
15. Insert dividing point.

Radiant - floors and walls scope
InstalSmart provides the opportunity to divide Heating/Cooling Floor Zone into a defined number of parts or along a drawn line without or with Expansion joint using the functions from the the right mouse button context menu.

Printing of the results tables
Print or save at any convenient format the tables with calculation Results.
Note: InstalSmart doesn't allow to print and export the drawings.

Saving the project and continuing it in the InstalSystem application
Proceed to save the project and, if necessary, continue working on it in InstalSystem application in accordance with Designing of radiant heating installation on the basis of data from the Smart application.